The concept of project 365 has been around for awhile. Mostly photographers trying to learn different techniques. It was made popular for scrapbookers by Becky Higgins http://www.beckyhiggins.com/ She even has a kit for sale to make the whole process easier. I'm gonna do my own thing though. Not because the kits not gorgeous, but because I have an overwhelming amount of stash that I need to use up. LOL
Until I did the December Daily last month I hadn't scrapbooked in ages, but I'm really excited about this project so I hope I can keep it up. I have taken pics for every day so far, & I'm working on getting my journaling caught up. I need to get some pics printed so I can start my pages.
I'm doing a 2 page 12x12 layout for each week, with smaller pages for days with more pictures.(holidays, birthdays,etc...)I would also like to do little pages for BOM(book of me) & One Little Word pages.
Showing posts with label links. Show all posts
Showing posts with label links. Show all posts
Thursday, January 27, 2011

Monday, January 18, 2010
Snowflake Garland
I wanted to make some of these snowflakes by Attic24. While I was messing with different colors I decided to string some together. They are made with #10 crochet cotton & a #7 steel hook(1.65mm) & joined "as you go" style. Here is her pattern. http://attic24.typepad.com/weblog/crochet-snowflake.html I think it's gonna make a lovely garland for next Christmas.


Saturday, January 16, 2010
Lucy Scarf
Lucy of Attic24 posted her scarf. http://attic24.typepad.com/weblog/2009/09/cicles-scarf.html I just had to give it a try. This was a Christmas gift for a friend. I used Caron's simply soft & H hook. It's not as wide as hers & I had to make about 40 circles for the length.


Warming our Wrists in the Attic
Lucy recently posted her lovely stripey wrist warmers. http://attic24.typepad.com/weblog/2009/10/wrist-warmers.html
So I had to make a pair or 2. I paired them with scarfs to give as Christmas gifts. Mine are made with Caron's simply soft & an E hook. They turned out lovely. One change I made was to use reverse single crochet for the bottom trim instead of the bobble edging. I also used it around the thumb hole.


So I had to make a pair or 2. I paired them with scarfs to give as Christmas gifts. Mine are made with Caron's simply soft & an E hook. They turned out lovely. One change I made was to use reverse single crochet for the bottom trim instead of the bobble edging. I also used it around the thumb hole.


Saturday, January 9, 2010
Scrap Ripple
I have so many half skeins & balls of leftover yarn that I was running out of room in the yarn closet. So in addition to the scrap hexagon, I'm starting a ripple afghan too.


The pattern I'm using is here at Attic24.http://attic24.typepad.com/weblog/neat-ripple-pattern.html

I love how easy it is once you get it started.

I wasn't sure I would like the "scrap" look, but I think it's quite pretty actually.

To my winners...I hope to get your packages sent out on Monday. ;)
Saturday, September 12, 2009
Dyeing Your Flowers
I found a couple of tutorials on dyeing your crochet flowers. I don't have reinkers so I had to fudge it. ;)


And here's my take. I used rit dye, water, rubbing alchohol, pearl-ex, & gum arabic. Mix it all up in a spray bottle & spray on flowers. I already had this mixed up to use like glimmer mist. I probably wouldn't use the pearlex or gum arabic if I was just mixing this up for flowers. The pearl-ex didn't show much.

Tuesday, September 8, 2009
Choker Pattern
I posted some pics of a choker I made here. http://crochetedsass.blogspot.com/2009/08/my-first-crochet-necklace.html
I made more & finally worked out a pattern I like.
Choker Pattern~
Choker Pattern~
With #10 crochet cotton & #7 steel hook ch91,
slst in 2nd ch from hook,
slst in next 4 ch, ch6
*skip next 2 ch, dc in next ch, ch3* (25 times)
ch6, skip next 2 ch, slst in next 6 ch,
finish off & weave in ends.
Add clasp. I use cord tip endings. Like these.http://www.firemountaingems.com/shopping.asp?skw=KWFNTERMINATESPENDCAP And a lobster claw clasp.
Optional flower: I made a single layer flower from Nichole Heady's pattern with # 10 thread & #7 hook. Here's the post I did on her flowers. http://crochetedsass.blogspot.com/2009/08/flowers-by-nichole.html
I just left the end threads a little long & don't work in. Tie the flower to the 13th dc, add some clear glue to the knot in back. When it's dry trim ends.
Here's a pic of the new necklace.

Saturday, August 22, 2009
Flowers by Nichole
Here is a cute little flower pattern by Nichole Heady. http://nicholeheady.typepad.com/capture_the_moment/2009/05/embellish-it-senior-challenge.html
I've used just the one layer on my necklaces & a card.
http://crochetedsass.blogspot.com/2009/08/crochet-trim-on-cards.html
http://crochetedsass.blogspot.com/2009/08/my-first-crochet-necklace.html
She also has a list of DMC color matches for Papertreyink's colors.
http://nicholeheady.typepad.com/capture_the_moment/dmcpti-color-coordinates.html
Saturday, August 15, 2009
Little Birdies Flowers
This link was posted on the "crochet your own fleurettes" thread on SplitCoastStampers. http://littlebirdiesecrets.blogspot.com/2009/03/how-to-crochet-flower-video-tutorial.html These are simple flowers, but they have great impact. There is also a video tutorial to help you learn this flower.
Here's the link for the thread on SCS. It's a great resource for patterns, tips, & chatter about crochet flowers. http://www.splitcoaststampers.com/forums/showthread.php?t=412822
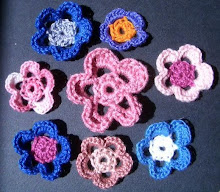
Here are a bunch that I did. You can vary the size of the flower with thread & hook size. It's also fun to change colors after the first round, or use varigated threads for a different look. The first row is #10 crochet thread & size #7 steel hook, second row is embroidery floss & # 5 steel hook, third row is #3 crochet thread & #2 steel hook, and the last row is 2 strands of #10 held together & #5 steel hook.

Here's the link for the thread on SCS. It's a great resource for patterns, tips, & chatter about crochet flowers. http://www.splitcoaststampers.com/forums/showthread.php?t=412822
Here are a bunch that I did. You can vary the size of the flower with thread & hook size. It's also fun to change colors after the first round, or use varigated threads for a different look. The first row is #10 crochet thread & size #7 steel hook, second row is embroidery floss & # 5 steel hook, third row is #3 crochet thread & #2 steel hook, and the last row is 2 strands of #10 held together & #5 steel hook.

Subscribe to:
Posts (Atom)